Monday 19 August 2019

WHQ SPIDERS!

finally.....


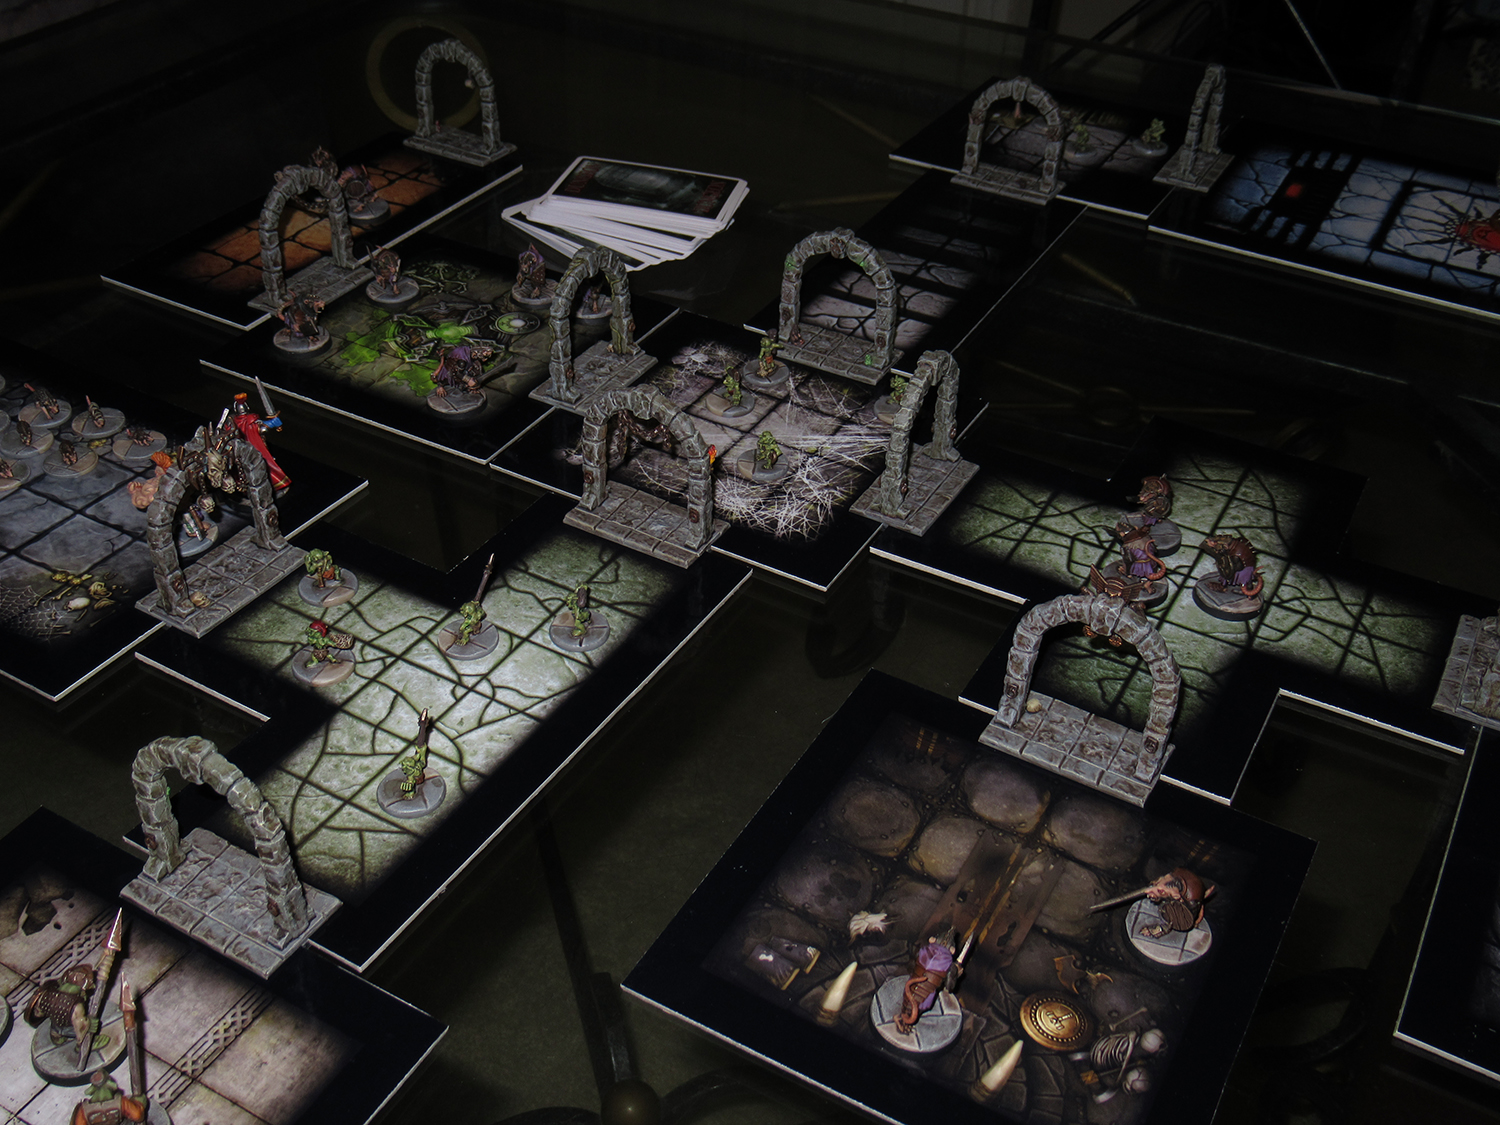
so spiders, i had a little problem with spiders for my recreation.
if you have read any of my previous posts you will see i set about making my own, for various reasons.

i kinda liked the original ones from the game, but wasn't keen on the mono-pose on them.
didn't want to pay Ebay prices.
the ones on the market just didn't fit what i wanted.

so in classic fashion...."I'll make my own"
but who wants to make 12 different spiders? from my previous posts it might be easy to gather i don't like units or large numbers of things at all...painting....even less sculpting.

so how could i go about it?
well i sculpted a spider with a wireframe skeleton. with the intention i could replicate the skeleton and case the outer body for the purpose if replicating, and this would then allow me to repose to move away from the mono-pose option.
so that was my first attempt...i say this because the sculpt wasn't yet completed. and i wanted to see if the idea would work first and foremost.

i wanted to find the right method for recasting that allowed me to put a wireframe inside, there was only 1 option here, and the sole reason i ended up buying some bluestuff too, however this bluestuff has come in mighty handy already for replication if simple shapes, but a spider? Of course the casting involved a flattened out spider, i needed to find the right material to use too.
needless to say i made about 4 spiders that ended up in the bin.
first my wire was too strong which didn't help with the posing.
i used an epoxy first which managed to capture all of the detail perfectly. but was also too brittle for the repose.
i ended up back with old Greenstuff...it lost a little detail. but its still relatively flexible when cure and allowed me to kick out my first spider...not perfect. but it was the first.
as you can see the one in white was the only epoxy spider that ended up being used. and you can see how it captured the bristles better than the green stuff. however the green stuff just held up better for this purpose.
needless to say. these weren't perfect, and i was never expecting them to end up looking perfect either.
however i wasn't too fussed about this. i was making something i could be appeased with.
i was happy with the scale, they ended up coming out a little cuter than expected, but hey

so... before i progressed i noticed some of the legs were a little chunky and some were longer than others, so i re-sculpted the bottoms of the legs so they were a little more slim lined and all the right length.
and on i went doing 2 spiders a day for the next week or so.
they didn't come out great. some were better than others, and some needed a little bit of carving or re-sculpting on certain areas that didn't take too well.
but regardless. they are not completed. and im pretty happy to be able to chalk another set of critters off my list.
i kinda painted them pretty muted, with autumn around the corner i was thinking more 'those nasty looking buggers you see webbing up your privet' as opposed to bright fantasy colours. i also figured this would help the not so great sculpts not stand out too much, they are what they are and they serve their purpose, and im happy with that :)


oh and instead of looking to buy a binding machine for over 100 quid i realised my local trusty printers also did allsorts of binding too. i kept it simple. for a nice and easy £4.25 all 3 books from the base game are now completed too


Sunday 4 August 2019

Bretonnian Questing Knight

whilst i have been busy making the core set for Warhammer Quest, in true 'me' fashion, i cannot help but do something extra. this is maybe linked to my loathing of working on units and the monotonous rinsing of the same things over and over. however it is nice to break this up with some variety. and having the option to use more warrior options when i do finally complete the base set isn't a bad option to have at all. so i have a trollslayer up and ready to go. i also have a witch hunter floating around for the next monotony breaking opportunity too.

but this guy i completed a few weeks back and i am not too happy with him in all honesty,  main reason for this being that i had to buy some new army painter anti shine...and well....its kinda shiny!
shit huh?

first up i tried the spray can i had left around which was kicking out white speckles. the can had clearly had its day and was no longer of any use.
and then i had to use a firm stippling brush to try and scrape the white flecks off the model without damaging the paint job too much. and the brush on anti shine i attempted to use to fix this wasnt much cop either. so when you have painted a model and it ends up getting ruined at the end you can either get it as best a possible. or strip it all and start again. obviously going with the first option here, it wasnt all doom and gloom.

i wanted to remove the idea of a quintessential questing knight, choosing instead to go for a more of a struggling jobber of a knight.
slightly unshaven, slightly damaged armour and such making him a perfect up and coming of age knight as opposed to a classic knight in shining armour.

however my anti shine had slightly different ideas on that! haha

another thing i want to do different with all of my warriors for this game..i want to show their faces. whilst i am fully aware warriors will die left right and centre. i don't want them to die as faceless heroes.

so this guy is made from reaper miniatures Baran Blacktree, whom seemed to fit the mould perfectly for what i wanted to achieve. All i have done here that is different is that I sculpted a a plume to his helmet to give that more bretonnian look.
also opting for a similar colour scheme to the original. you have to excuse the freehand on the shield. this is another one of the reasons i wasnt too happy how this guy turned out.
along witht he fact i should of painted him without his shield arm. because no matter how hard i tried. i couldnt get any good direct contact with my paint brush onto the left of his face.


that lame anti shine really shows up on the cloak of this guy. maybe one day they will change the formula back to actual matt finish and i can fix him?

regardless. something cool for me to sink my teeth into. and i'm cooking up loads of ideas on what i want to do for the warriors already
i have a very distinct and different idea for the pit fighter
and i am pretty confident the witch hunter is also going to turn out good.
i want to replace the wizard with a new one and have seen plenty of options floating around.
same goes for the elf and dwarf, of which being the only man in the house. i may well have to be making some female options to boot.

any way hoping you liked sir shiny shine outcast of antishine land :)


Friday 2 August 2019

RATS IN THE CELLAR!

classic level 1 fodder in anything fantasy based. a game simply wouldn't be a game without the mundane need to go and clear out a room full of rats.
but these babies bite back!
finally repainting the bases i decided to give the paint jobs a bit of a spruce up too. previously i just slapped on some base coats and threw some agrax earthshade over them but this time i decided to add a little more detail. vary some of the washes on the furs and generally just add a little more detail.
also another perfect reason to show off the dungeon with its ever growing list of denizens
i also wanted to share what i have had in the works along with this
i'll leave the discovering to you guys, but things are really starting to take shape nicely and i get to tick off another from my to do list.
go me!

Saturday 6 July 2019

12 snotlings and a new camera

well i posted these a while back but as part of my warhammer quest construction. these guys got counted out and a slight repaint. being a nice and easy to tick off the list.

i decided to mute the colours a bit from previously done and i feel they look much better for it.
along with this i decided to treat myself today to a brand new camera. my existing one was starting to develop damaged pixels and has served me well for the last 10 years or so that ive had it so it was time to get myself a slight upgrade along with it.
ive been toying around and so far have managed to get appealing enough pictures taken. but no doubt it will take a bit more practice to truly nail it down.

Along with this i decided to also give a run out of the dungeon tiles and doors that have been newly created, just laying out a mocked up dungeon here using exclusively tiles created by the fantastic sebastian stuart over at eastern empire. having a nice set up with varied colours and depths would be a good run out for the new camera.


This little guy i have a very fond connection with. he came in a blister pack of 18 bloodbowl snotlings for the grand old price of 1.99 and this was the first ever blister pack i had ever bought, i remember my mother saying how expensive they were (this was maybe 1988/89) and the only way i could convince her to buy me something was by the claim "but this one has 18 in it!!" it worked obviously and this seems to be the only critter that survived. and still going strong today having a good old dig up his nose 30 years later


I'm really happy how all of this is turning out. which is rare for me. and i hope you will agree with me...this aint a bad setup! :)

next up ill have some photos of my twist on the bretonnian questing knight to add to the collection and hopefully some progress on my spider prototyping.

cya

Tuesday 25 June 2019

venture through the door....

so with my relatively new problem arising regarding doors falling over constantly. i swiftly cracked on from my previous post, getting these new bases painted up and in place to see how they worked.

i ran a couple of test dungeons plotting out the layout and clipping the doors in as i went. these worked pretty well. some gripped a little too tightly, but was easily fixed just by flexing them a little.
pinning them was definately a good choice to make as it mean that the superglue could crack up a little and they were still held in place by the pins, thus making the clips more flexible and not damaging my new floor tiles
and they held together nicely. i ran a dungeon that literally filled up my entire 4ft x 4ft table, snaking around the edges meant i had to shift its position quite frequently, but it all held together relatively weel with only 1 door clip being a little looser than the others.
so not to bad of an effort, and now i can get back on track.
even mixed with all the extra addons...a hell of a lot of corridors seem to crop up!

well thats that problem solved. next i need to get some monsters painted up!

Sunday 23 June 2019

The Quest continues

Rather than me vanish for long periods of time i figured i would post up more progressional blogposts to keep myself on track and share what ive been doing.

so having created my floorpans and such i realised 1 massive design flaw that i had overlooked which was part of the original game...doorclips!!
my tiral dungeon runs so far involved all of my doors rocking precariously but more than often..just falling over. i knew i needed to fix it so put everything else on hold to get something in place.
and luckily....they worked!


  1. using 1mm thick plasticard i constructed a base/clip which was 30 in depth and as wide as my doors, the section inbetween which operates as the clip im made sure was as close to 0.1mm thinner than the overall floortiles, and additionally i pinned these clips to allow some flex upon gripping the tiles so not to damage them
  2. checked they fit nice and snugly then repeated this process 13 times to cover the 12 doors and a portcullis
  3. putting them all to one side i then worked on only one as my prototype, and sculpted some greenstuff flagstone to ensure the doors would fit nicely into the recess.
  4. using Bluestuff i created a singular mold from my prototype
  5. and then using my new mold proceeded to complete all of the others
next job is to get these bases painted up and get those doors glued on.

additionally to this i thought i would share my spider prototype.
It doesnt look like much just yet, but wanted to show my intentions. and what i have planned
so this guy is pretty small. infact his legspan is probably about 32mm maximum.
And the reason for the pose is deliberate too. it isnt posed at all, and if you look carefully you can see i have put some semi sturdy wireframe through him.
the plan here once i have finished his sculpt is to replicate 12 of these using a bluestuff mold and put wires through each one. then i will 'hopefully' be able to pose each one uniquely...its a bold move i think. and one i hope pays off.

and finally. i wanted to share a new way i develop my bases
you know all of those scrap bits of putty or greenstuff you have left over from mixing too much?
i made them into flagstones on an old piece of plasticard, made a bluestuff mold and et voila
this save me a shed tonne of time too. and any extra greenstuff i have left over..gets sculpted into more flagstones.

so the next week will compromise of me painting up these new door bases so i can get that little speed bump put to bed. and next wekk i will be able to show them all being put to use.

anyways hope this prove helpful for someone out there :)

Saturday 8 June 2019

A Wanderer Returns...

It's been a while.................


i was kinda stuck in a dungeon........


lost for a long time................

but hopefully now i'm back. until my next wander off into the mountains.
i kind of have literally been stuck in a dungeon. and also bring a few goodies.
on my way from the mountains i got sidetracked and had to spend a few weeks at the ye olde photoshoppe, as well as a few stops at various different print masters until i had enough to fill up my pack on my return

firstly i had this
printed off on a huge A0 poster, additionally there is a second print which i didnt photograph.
using all of the WHQ base game tiles and tokens as well as all of the expansions WD addons and some fan made content also thrown into the mix.

part of my quest meant i ended up getting through quite a few swords once i put these onto 2mm thick greyboard
just to get an idea here. it took about 15 gentle cuts to make a full cut to each side of these. i think i rinsed through about 8 or 9 blades. and whilst these would of obviously been better of punch cut...that's not how the home made stuff works is it?
60 bazillion cuts later and having lost the feeling in my index finger and thumb i ended up with these.

and just because i had to get a shot for effect....
you can still see the cardboard dust everywhere hehe.
you may also see a snippet of my bretonnion knight (will get some good pics of him soon)
and how my dungeon doors also pan out. based on the tile size with 30mm squares and 15mm edging. i may well base my doors on something that fills the gap a little better, i may possibly make some similar bases to the original WHQ doors so all of these can clip together.

but there's more
you may of seen my trial card print of WHQ treasure cards way back in may of last year here
well that trial went pretty well and i spent a good portion of time within photoshop (yes i'm talking normally now) in order to flesh out all of the base game cards.

having already done the treasure cards from the base game and all expansions. i took it a little further adding all of the remaining WD cards too. as well as my own art for all of the other cards so that i could have a fresher looking but similar design


but that also wasnt enough. the cost to get these shipped from america meant it was worthwhile that i flesh out as much as possible.
i also added the dark secret cards tot he mix as well as all of the Beyond the grey mountains fan made cards.
i preferred the idea of drawing cards and laying them out in the middle of the table to set the scene for settlements. also taking on the additional event cards and their objective cards. sadly this project seems to be no more, but i have to say i'm a huge fan of what they did and have certainly helped me out here.
oh and finally i managed to repaint some bases of skaven to tick off my list. nothing too major. but still a step in the right direction.
i have also added a page at the top of the blog to help track and show how far along i have managed to get thus far. and hopefully this will be a steady movement for blogging at least for the the next year.

hope you like.